Jenkins Integration
Example to integrate Jenkins using Webhooks
Home / Keptn v1 Docs / Release 0.15.x / Custom Integrations / Webhook Integration
Learn how to integrate external tooling using Webhooks
Example to integrate Jenkins using Webhooks
Webhook integrations using Webhooks
Keptn has a built-in capability, via the Keptn webhook service, to call external HTTP endpoints as part of sequence task orchestration.
Webhooks allow you to easily integrate various third-party tools such as testing services, CI/CD pipelines, and incident management services. In addition to just invoking the third-party webhook receiver, webhook subscriptions can be configured to wait for the third-party webhook receiver to send back details about what it did.
Depending on the receiving tools configuration, data can be either passed within the payload body or as query params in the URL along with any required headers and API tokens.
Webhook configurations, referred to as subscriptions, are created at a Task level and are configured to listen to one of the following task event types:
| Event types | Description |
|---|---|
| Task triggered | The task has been triggered but is not yet running. |
| Task started | The task has begun running. |
| Task finished | The task has finished. |
Broadly, there are two types of webhooks:
started or finished events.triggered event and the Keptn webhook service sends both the task started event and the task finished event to complete the sequence task.triggered event and the Keptn webhook service sends the task started event. The sequence then waits for the third-party webhook receiver to send back a task finished event to complete the sequence task.For this use case, a webhook subscription is configured to listen to a task started or finished event. For this to work, some other Keptn service is responsible to send the task started and finished events to complete the sequence task.
One example is the evaluation task. Here the Keptn lighthouse service sends the evaluation started and finished event with Service Level Objective (SLO) evaluation results. By subscribing to the finished event, the SLO results can be sent to some third-party webhook receiver such as Slack.
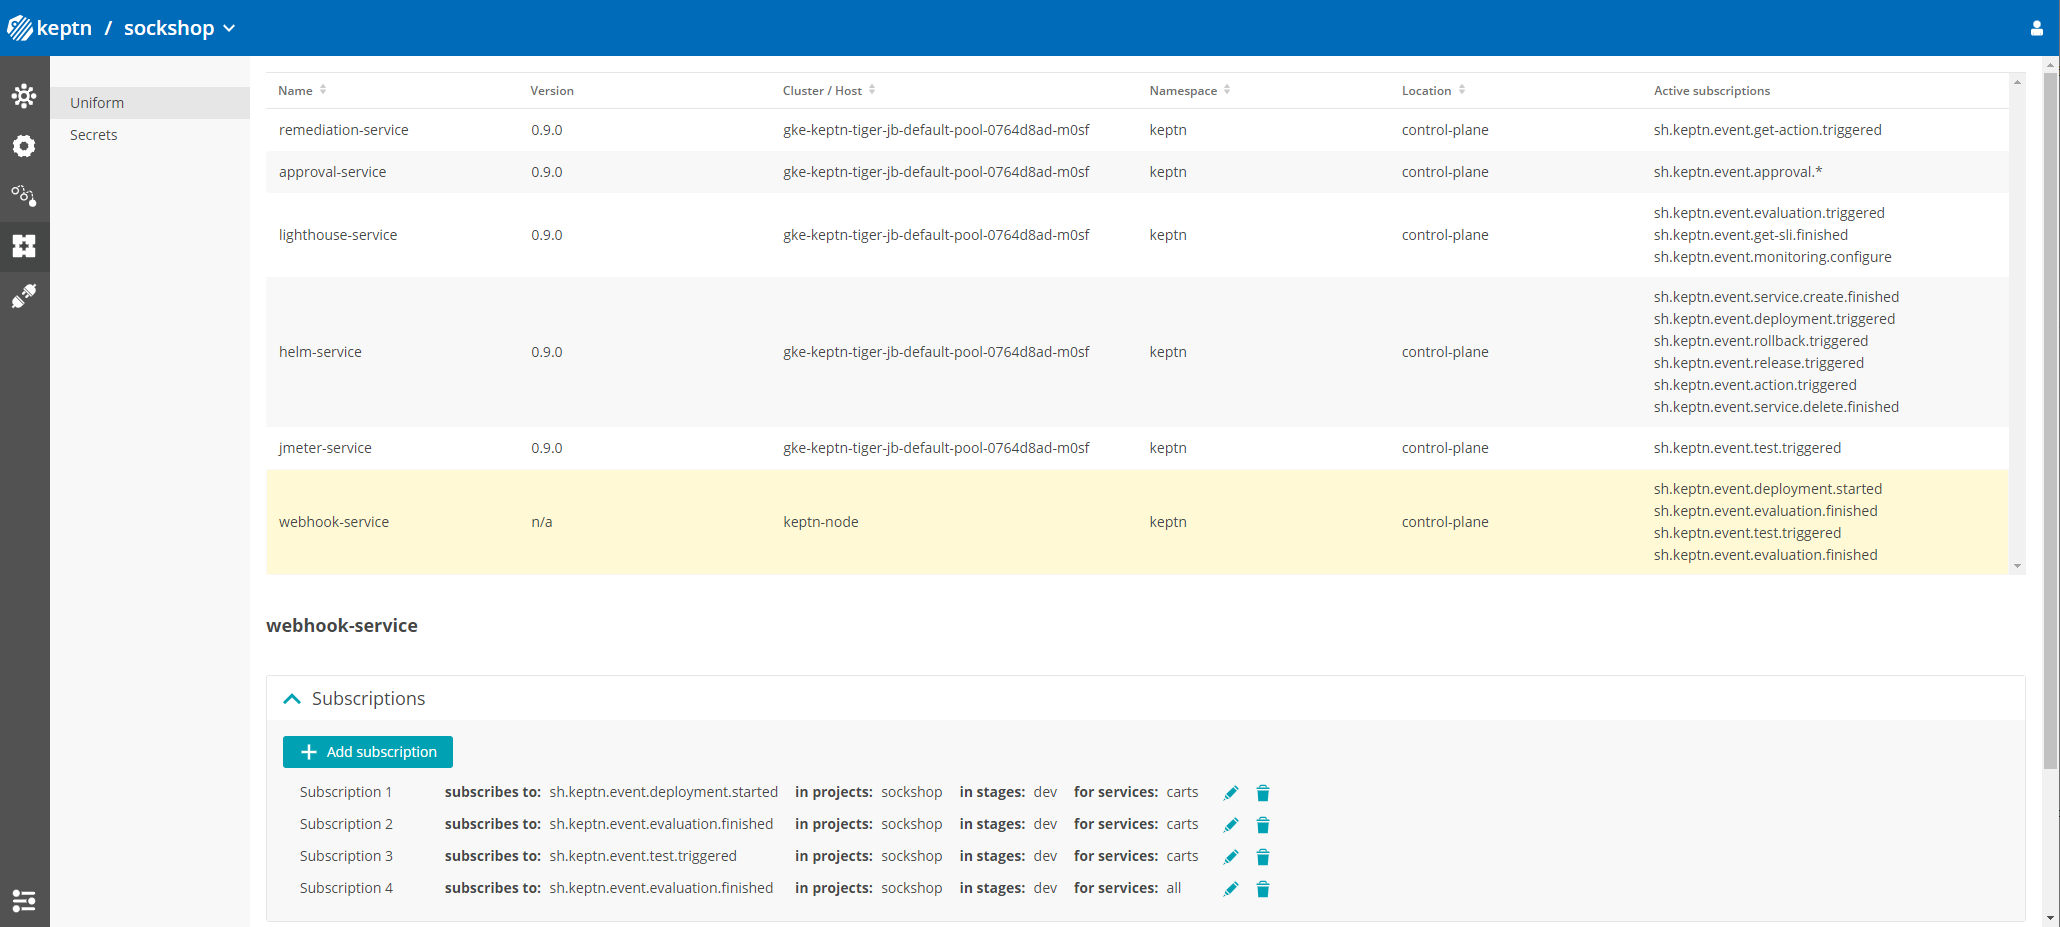
Step 1: Add subscription
To create a webhook integration, open the Keptn Bridge, select a project, and go to the Uniform page. Then select webhook-service and click the Add subscription button as shown below.
Step 2: Configure subscription
In the subscription form, provide the information for the task subscription and webhook configuration:
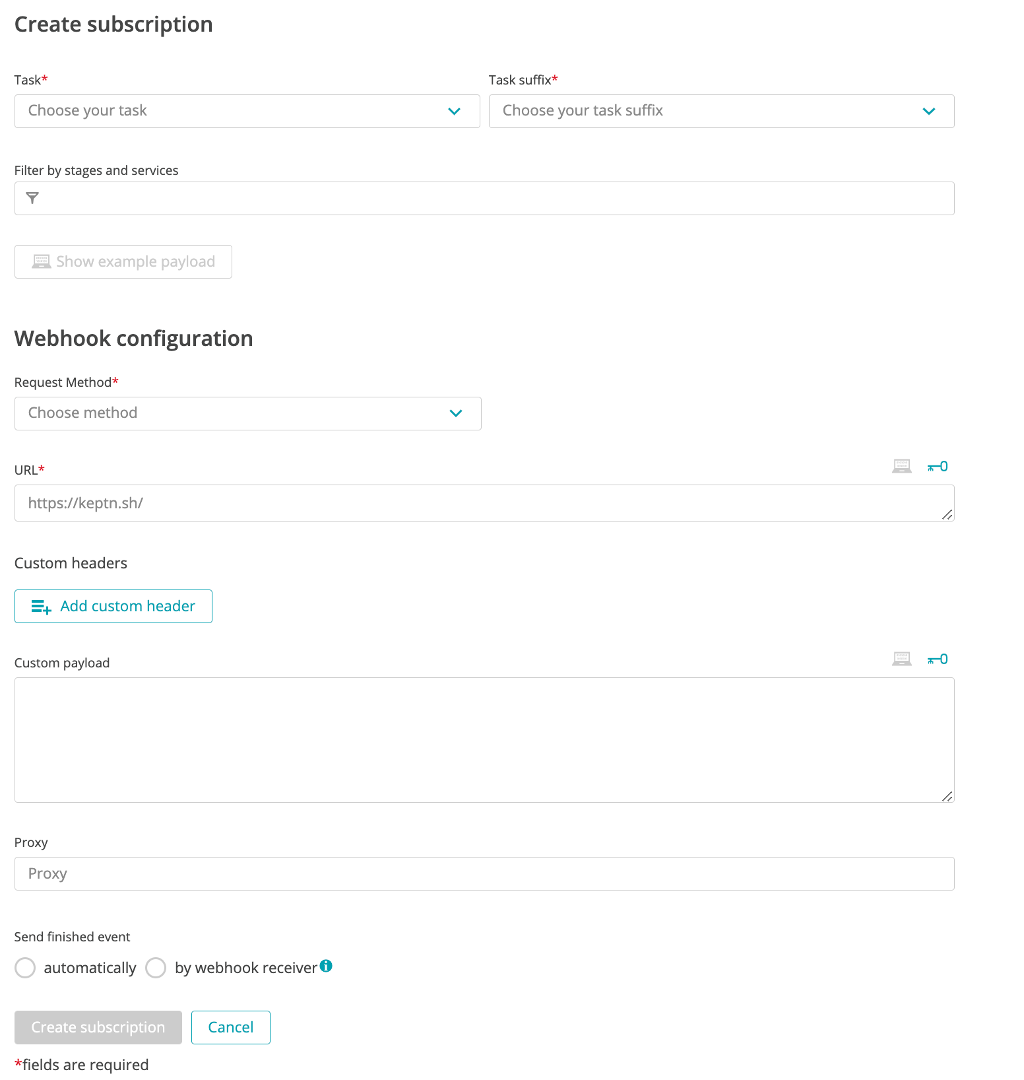
Subscription:
test or deployment)started, or finishedWebhook configuration:
GET, POST or PUT.Important Notes:
Content-Type: application/json so be sure to add this as a custom header.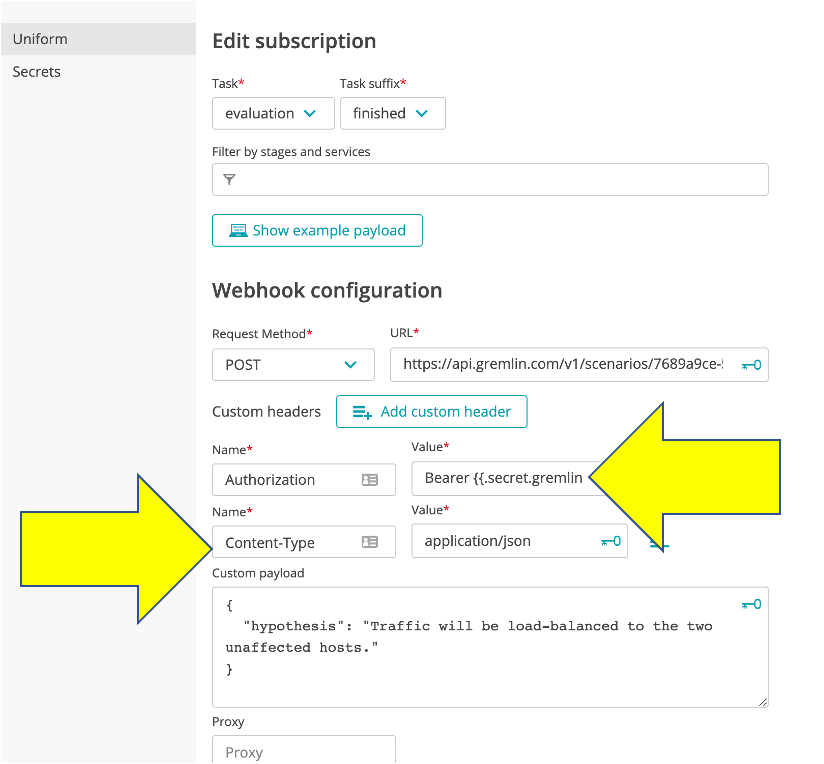
Step 3: Custom payload
If the third-party webhook receiver requires this, add a payload to match the format requested by the receiving endpoint.
The output format of the webhook (i.e., the payload of the request body) can be customized using event data to match the required input format of the tool you are integrating with. Therefore, you can reference the data field (event property) using Go templating.
For example, if you would like to get the value of the project property from the subscribed event, type in: {{.data.project}}. A look at the example event can help to identify the proper data field.
An example of a customized request payload:
{
  "text": "Evaluation in {{.data.stage}} finished with result {{.data.evaluation.result}} and score {{.data.evaluation.score}}."
}
Based on the Go templating capabilities, you can:
"{{if .fieldName}}{{.fieldName}}{{ else }}No field name set{{ end }}""{{ index .articles.Content 0 }}""{{ index .data "incident-management-tool".url }}"An example of a customized request payload using a condition on an array element:
{
  "deploymentURL": "{{if index .data.deployment.deploymentURIsPublic 0}}{{index .data.deployment.deploymentURIsPublic 0}}{{else}}No deployment URL provided{{end}}"
}
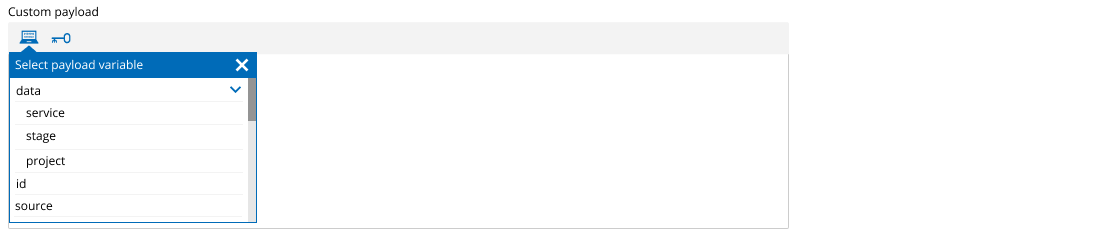
A convenient way to add event properties to the URL or custom payload is the property picker.
To use this, put your cursor in the URL or text field at the spot where you would like to customize the payload. Clicking the computer icon will open a list of data fields you can add to the payload or URL. This list of data fields is derived from the event your webhook is subscribed to.
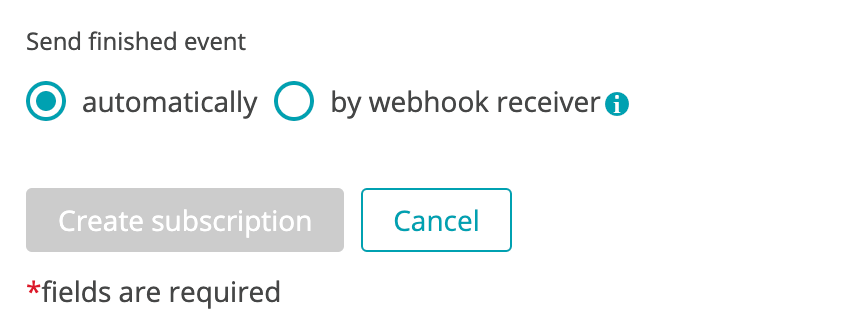
Step 4: Set “Send Finished Event” flag
The Send finished event flag is not applicable to a passive webhook. So you can leave it unselected as shown below.

Step 5: Create subscription
Click the Create subscription button to save and enable the webhook for your integration.
For this use case, the Keptn webhook service sends both the task started and task finished events to complete the task sequence.
An example Passive webhook is setting a feature flag where the Third-party webhook receiver can’t send confirmation that it set the flag.
Add subscription
Follow the same steps above to add a new webhook subscription, but configure it to listen to a Task suffix of triggered.
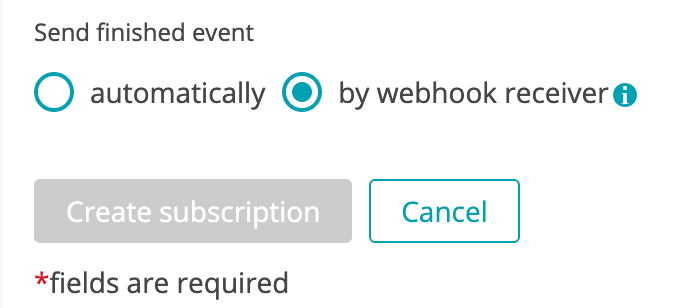
Ensure that the Automatically option is selected as shown below. When this is set, the webhook service will automatically send the task finished event for your subscription.
Click the Create subscription button to save and enable the webhook for your integration.
This type is called Active because the Keptn webhook service will first send the task started event and the third-party webhook receiver sends back the finished task event to complete the task sequence.
An example Active webhook is to trigger a system to open an incident management ticket and send back the newly created incident ticket number within the task finished event so that the sequence can continue.
Important Note:
finished event, the sequence will remain in a waiting state and will not continue until it times out or it receives the task finished event.Step 1: Add subscription
triggeredfinished event:{{.id}} - required in the triggeredid attribute of the finished event{{.shkeptncontext}} - required in the shkeptncontext attribute of the finished event{{.data.project}}, {{.data.service}}, {{.data.stage}}Follow the same steps above to add a new webhook subscription, but configure it to listen to a Task suffix of triggered.
Ensure that the By webhook receiver option is selected as shown below. When this is set, the webhook service will expect the webhook receiver to send back the task finished event.
Click the Create subscription button to save and enable the webhook for your integration.
Step 2: third-party webhook receiver
Since no finished event is sent by the Keptn webhook service, the third-party webhook receiver must send a finished event using the /v1/event endpoint of the Keptn API. The Keptn cloud event must contain the following attributes:
type - required event type in format of sh.keptn.event.[REPLACE WITH YOUR TASK NAME].finishedtriggeredid - required id from the task triggered cloud eventshkeptncontext - required shkeptncontext from the task triggered cloud eventdata.project, data.service, data.stageFor example:
curl -X POST "https://KEPTP_URL/api/v1/event" -H "accept: application/json" -H "x-token: KEPTN_API_TOKEN" -H "Content-Type: application/json" -d JSON_DATA

JSON_DATA example:
{
  "data": {
    "project":"YOUR PROJECT",
    "stage":"YOUR STAGE",
    "service": "YOUR SERVICE",
    "status": "succeeded",
    "result": "pass"
  },
  "source": "keptn-project",
  "specversion": "1.0",
  "type": "sh.keptn.event.[REPLACE WITH YOUR TASK NAME].finished",
  "shkeptncontext": "REPLACE WITH SHKEPTNCONTEXT FROM THE TRIGGERED EVENT",
  "triggeredid": "REPLACE WITH ID FROM THE TRIGGERED EVENT"
}
The third-party webhook receiver can also send back custom information within the finished event.
This custom data will be automatically appended to every remaining triggered task event in the sequence. The data much be passed in an attribute with the name of the task.
For example for a task named createTicket, the following is sent back within the data.createTicket attribute as shown below:
{
  "data": {
    "project":"YOUR PROJECT",
    "stage":"YOUR STAGE",
    "service": "YOUR SERVICE",
    "status": "succeeded",
    "result": "pass",
    "createTicket": {
      "customKey1":"customData1",
      "customKey2":"customData2"
    }
  },
  "source": "keptn-project",
  "specversion": "1.0",
  "type": "sh.keptn.event.[REPLACE WITH YOUR TASK NAME].finished",
  "shkeptncontext": "REPLACE WITH SHKEPTNCONTEXT FROM THE TRIGGERED EVENT",
  "triggeredid": "REPLACE WITH ID FROM THE TRIGGERED EVENT"
}
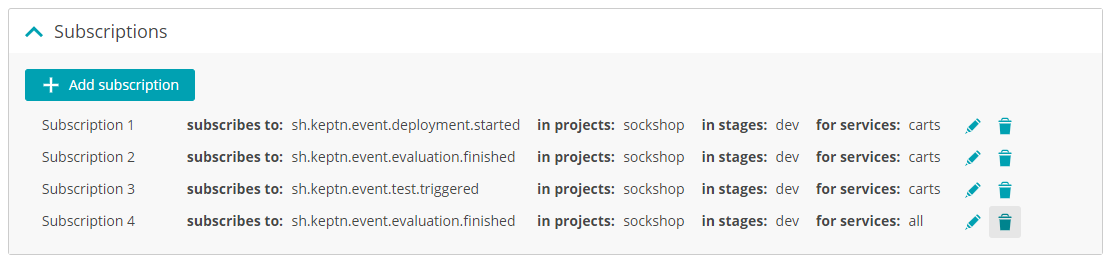
To delete a webhook integration, click on the trash can icon next to the subscription. Note that deleting a webhook is permanent and cannot be reversed. Once deleted, Keptn will no longer send requests to the endpoint.
Important Note:
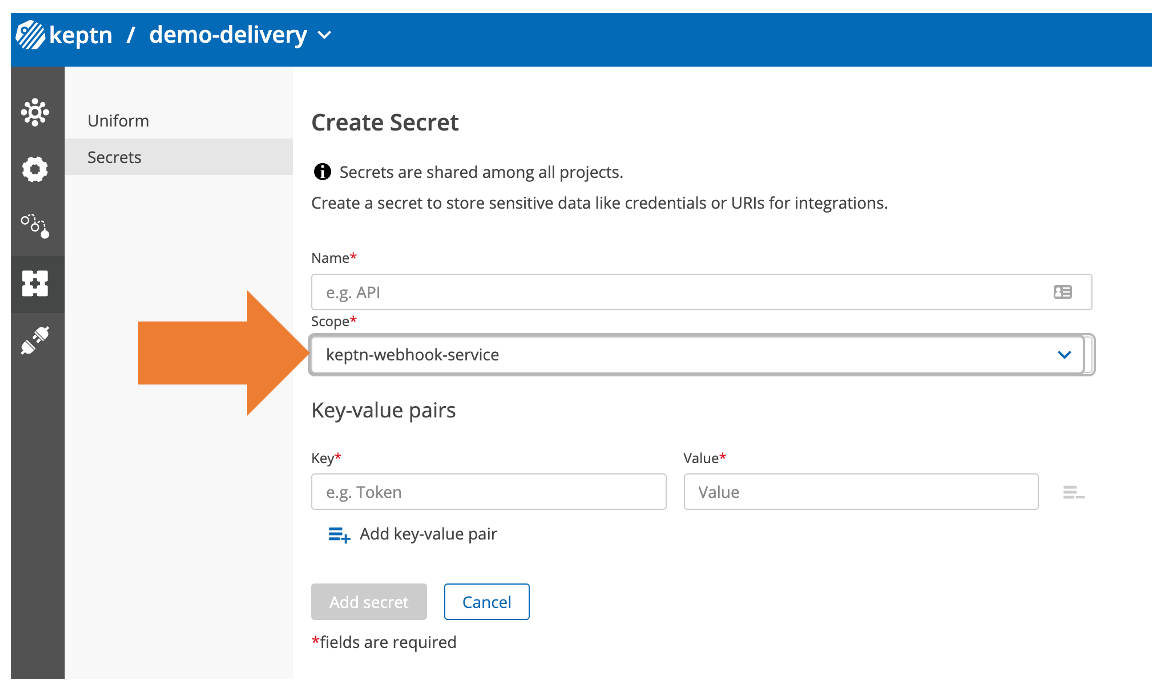
When integrating tools by calling their endpoints, many times authentication is needed. This is done by storing an authentication token that is part of the webhook request. Since Webhook subscriptions are stored in clear text within the upstream Git repo, so be sure to store tokens or other secret data as Keptn secrets as follows:
Create a secret with a unique name, secret scope set to keptn-webhook-service, and a key:value pair whereas the key is a unique identifier of your secret and the value holds the sensitive data.
When configuring your webhook, you can reference the sensitive data as part of the URL, Custom header, and in the Custom payload. Therefore, click the key icon that opens the list of available secrets. Select your secret and specify the key that refers to the sensitive data you would like to include at this point and the key-value pair will be automatically inserted into the selected field in the format {{.secret.name.key}}.
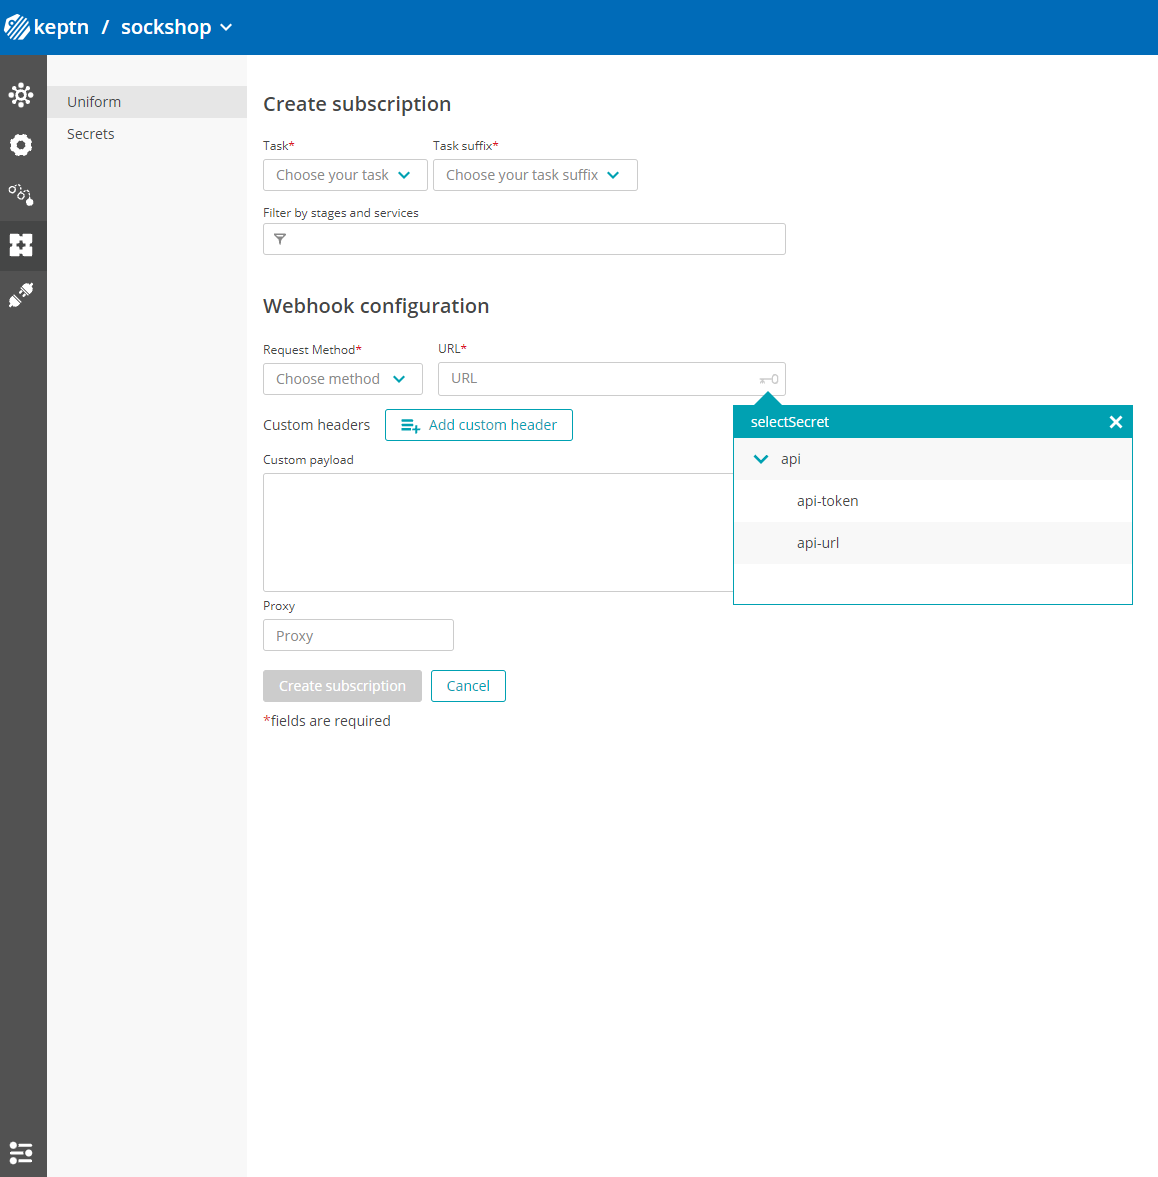
For example, a secret called api with key called api-token used in a webhook URL for triggering a Jenkins job would look like:
https://example.com?token={{.secret.api.api-token}}"
Important Note:
When the webhook configuration is saved, the secret will be parsed into a different format, which looks like this: {{.env.secret_name_key}}. This format represents a unique name that is a referrer to an entry in the envFrom property in the webhook.yaml file. This envFrom property contains added secrets with a referrer name, the given secret name, and secret key.
apiVersion: webhookconfig.keptn.sh/v1alpha1
kind: WebhookConfig
metadata:
  name: webhook-configuration
spec:
  webhooks:
    - type: sh.keptn.event.deployment.started
      envFrom:
        - name: secret_api_token
          secretRef:
            name: api
            key: api-token

      requests:
        - "curl --request POST https://example.com?token={{.env.secret_api_token}}"
Prerequisite: This requires access to the upstream Git repo in order to modify the webhook configuration files.
For more advanced configuration options, you can modify the raw request declared as curl command. Therefore, you need to access the webhook.yaml config file in the upstream Git repo you set for an upstream. In this upstream Git repo, you find the webhook.yaml file based on the filters you selected on the task subscription, e.g., if a filter is set for stage production, go to the production branch.
Example of a webhook.yaml containing a webhook request declared as curl command:
apiVersion: webhookconfig.keptn.sh/v1alpha1
kind: WebhookConfig
metadata:
  name: webhook-configuration
spec:
  webhooks:
    - type: sh.keptn.event.evaluation.finished
      requests:
        - "curl --request POST --data '{\"text\":\"Evaluation {{.data.evaluation.result}} with a score of {{.data.evaluation.score}} \"}'
          https://hooks.slack.com/services/{{.env.secretKey}}"
Important Note: